Guides

The Isle Admin Commands: Full List and Setup Guide
A player is blocking the spawn on your The Isle server, and one of your friends is stuck on a rock with a broken leg. Admin commands handle both. They work as soon as your SteamID64 sits in the right config file. Nitrado’s The Isle servers run the game’s Legacy build, so the console commands below are the ones your server accepts. In this Nitrado guide, we’ll show you how to become an admin and use The Isle admin commands on your own server.
How to Become an Admin on Your The Isle Server
Admin rights come from your Steam ID, not from an in-game menu. You add that ID to the Game.ini file while the server is stopped, and it applies the next time the server starts.
⚠️ Before making changes to your The Isle server, we recommend making a backup.
- Firstly, you’ll need your SteamID64 and the IDs of your admins.
- You can use SteamID.io to easily gather the SteamID64 of a Steam user.

- Next, go to your Nitrado Web Interface and stop your server.
- Then, in the left menu under Settings, click Config Files.
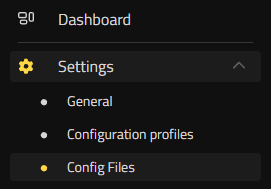
- From there, use the file dropdown to select and edit the
Game.inifile. - In that file, find the section
[/script/theisle.igamesession]. - Under that section, add the following command line:
ServerAdmins= - Then, add your SteamID64 to the line of code like this:
ServerAdmins=12345678XXXXXXXXX- You can add multiple admins by separating the IDs with a comma, like this:

- After adding those IDs, press Save Changes and start your server.
You have now successfully set yourself as an admin on your game server and can start running commands in game!
How to Use The Isle Admin Commands
To open the command console in the game, press the Enter key. Type the command you want, then press Enter again to run it. Only the Steam IDs listed under ServerAdmins= can run them.

The Isle Admin Commands List
Every command starts with a forward slash. Replace the bracketed part with the player name, Steam ID, or value you want.
| Command | Description |
|---|---|
/adminpanel |
Opens an admin panel on your The Isle server to send announcements, manage players, and run commands. |
/kick [player name] [reason] |
Removes a player from the server for a specific reason. |
/kickid [steam id] [reason] |
Removes a player from the server using their SteamID. |
/ban [player name] [hours] [reason] |
Bans a player from the server for a specified number of hours. |
/banid [Steam id] [hours] [reason] |
Bans a player using their SteamID. |
/unban [Steam id] |
Unbans a player. |
/announce [message] |
Makes an announcement that everyone can see. |
/heal [player name] |
Relieves a broken leg, hunger, and thirst. |
/slay [player's name] |
Kills a player; useful if someone wants to change dinosaurs. |
/goto [player name] |
Teleports you to a specific player; useful if someone is stuck. |
/bring [player's name] |
Teleports a player to your location. |
/time [hour in military time] |
Changes the time within the game. |
/grow [player name] |
Advances you or another player to the next stage of growth. (You still need to click “Grow”). The player is automatically healed. |
/weather [condition] |
Changes the weather. |
Pro Tip: /adminpanel covers most of this list in one window, which is faster than typing during a busy evening on the island.
Rule the Island
Your Steam ID is in Game.ini, the console opens with the Enter key, and kicks, bans, heals, and teleports are one line of text away. That is enough to keep a server civil and to dig a friend out of the terrain when the map decides otherwise. Round up your pack and get back to the hunt. 🦖
Frequently Asked Questions (FAQ)
How Do I Become an Admin on My The Isle Server?
Get your SteamID64 from SteamID.io, then stop your server and open Game.ini under Settings > Config Files. Under the [/script/theisle.igamesession] section, add ServerAdmins= followed by your ID, like ServerAdmins=12345678XXXXXXXXX. Separate multiple IDs with a comma, save the file, then start the server.
How Do I Use Admin Commands In-Game?
Press Enter to open the console, type the command, then press Enter again. Commands only run for the Steam IDs listed under ServerAdmins=.
What Are the Most Useful Admin Commands in The Isle?
/adminpanel handles most day to day moderation in one window. Beyond that, /kick and /ban deal with problem players, /heal clears hunger, thirst, and a broken leg, and /goto puts you next to whoever needs help.
How Can I Teleport Players or Myself in The Isle?
Use /goto [player name] to teleport yourself to a player, and /bring [player name] to pull that player to you. Both are the quickest fix for someone stuck in the terrain.
How Do I Grow or Heal Players?
/grow [player name] advances a player to the next growth stage and heals them, though the player still has to click “Grow”. /heal [player name] restores hunger and thirst and relieves a broken leg.
Can I Use SteamID64s to Manage Bans and Kicks?
Yes. /kickid [steam id] [reason], /banid [steam id] [hours] [reason], and /unban [steam id] all take an ID instead of a name. They are the safer option when player names are similar or unknown.
Can I Automate Weather or Time Changes?
No. Commands are entered one at a time, either typed into the console or run from the admin panel.
How to Become an Admin on Your The Isle Server
How to Use The Isle Admin Commands
The Isle Admin Commands List
Rule the Island
Frequently Asked Questions (FAQ)
- How Do I Become an Admin on My The Isle Server?
- How Do I Use Admin Commands In-Game?
- What Are the Most Useful Admin Commands in The Isle?
- How Can I Teleport Players or Myself in The Isle?
- How Do I Grow or Heal Players?
- Can I Use SteamID64s to Manage Bans and Kicks?
- Can I Automate Weather or Time Changes?