- startseite /
- guides /
- installation von altis life de
Guides
Kategorie A-Z

Installation von Altis Life
 Miete dir jetzt deinen eigenen prepaid ArmA Server auf nitrado.net
Altis Life steht zur einfachen One-Klick Installation bereit.
Bei der Neubestellung kann als Startspiel “ArmA 3: Alts Life” ausgewählt werden.
Bei einem bestehenden Gameserver kann im Webinterface > Spiel wechseln > Arma3 > Neuinstallation das Altis Life Modpack ausgewählt werden.
Was ist Altis Life?
Altis Life ist eine Server Modifikation für ArmA 3. ArmA ist ein Taktik-Shooter, der in der nahen Zukunft angesiedelt ist. Der Spieler befindet sich auf der griechischen Insel Altis und spielt als Polizist oder Zivilist. Das Ziel des Spiels ist Geld und Freunde zu machen.
Installation von Altis Life (ArmA III) auf deinem Nitrado Gameserver
Folgende Voraussetzungen sind nötig:
- Nitrado.net Gameserver
- FTP-Client
- PBO Manager
Step-by-Step
- ArmA 3 Server installieren
- Möglichkeit 1: Nitrado.net > Gameserver bestellen > Publicserver Basic > Spiel “ArmA 3” > Bestellen
- Möglichkeit 2: Webinterface des Gameservers öffnen > Gameswichting > ArmA 3 installieren
- Server stoppen
- Altis Life RPG downloaden
- Im offiziellen Forenthread von Altis Life RPG kann die Modifikation heruntergeladen werden. Zum direkten Download hier klicken.
- Archiv ” [email protected] _altis-life-rpg_v3-1-2.altis.7z” entpacken
- Das Archiv [email protected] _altis-life-rpg_v3-1-2.altis.7z entpacken (bsp. 7-ZIP, WinRar, …).
- Den Ordner @life_server via FTP in das Verzeichnis /arma3/ des Gameservers hochladen.
- Das Archiv ExtDB hier herunterladen.
- Das Archiv release/windows/20 entpacken (bsp. 7-ZIP, WinRar, …).
- Den Ordner @extDB via FTP in das Verzeichnis /arma3/ des Gameservers hochladen.
- Die Dateien tbbmalloc.dll, tbb.dll, extdb-conf.ini, extDB-test.exe via FTP in das Verzeichnis /arma3/ des Gameservers hochladen.
- Die Missions-Datei Altis_Life.Altis hier herunterladen.
- Die Missions-Datei Altis_Life.Altis via FTP in das Verzeichnis /arma3/mpmissions des Gameservers hochladen.
- Die Datei server.cfg bearbeiten.
- Die Datei server.cfg kann über das Webinterface > Config Editor aufgerufen werden. Dort ist folgender Eintrag am Ende der Datei zu ändern:
class Missions { class ARMA3 { template = Altis_Life.Altis; difficulty = "Regular"; }; };
-
- Die Datei server.cfg nach Bearbeitung speichern.
- Im Webinterface > Einstellungen unter zusätzliche Mods folgendes einfügen: @extDB;@life_server
- Im Hauptverzeichnis ( /arma3/ ) die Datei mit dem Namen extDB-conf.ini öffnen. Folgenden Inhalt in dieser Datei bearbeiten. Die Informationen können aus dem Webinterface > MySQL DB ausgelesen werden. Runterscrollen bis zum Index [DATABASE2] und die Standart Daten durch deine MySQL Zugangsdaten ersetzen.
- Erstellung der MySQL-Datenbank Struktur:
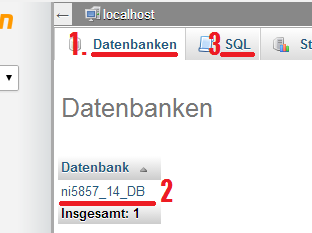
- Webinterface > MySQL DB > Login (phpMyAdmin)
-
-
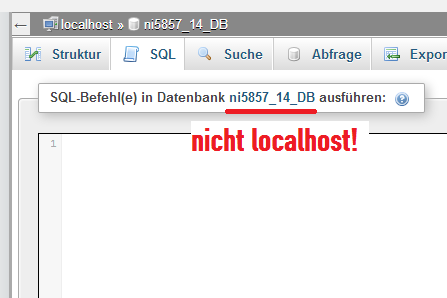
- Auf die Datenbank klicken, im Menü oben SQL anklicken. In das Eingabefeld folgenden Inhalt einfügen.
SET SQL_MODE = "NO_AUTO_VALUE_ON_ZERO"; SET time_zone = "+00:00"; /*!40101 SET @ [email protected] @CHARACTER_SET_CLIENT */; /*!40101 SET @ [email protected] @CHARACTER_SET_RESULTS */; /*!40101 SET @ [email protected] @COLLATION_CONNECTION */; /*!40101 SET NAMES utf8 */; -- -- Database: `DB_NAME` -- Default Schema -- -- -- Procedures -- Edit arma3 and root to match a user in MySQL -- CREATE DEFINER=`DB_NAME`@`localhost` PROCEDURE `resetLifeVehicles`() BEGIN UPDATE vehicles SET `active`= 0; END$$ CREATE DEFINER=`DB_NAME`@`localhost` PROCEDURE `deleteDeadVehicles`() BEGIN DELETE FROM `vehicles` WHERE `alive` = 0; END$$ CREATE DEFINER=`DB_NAME`@`localhost` PROCEDURE `deleteOldHouses`() BEGIN DELETE FROM `houses` WHERE `owned` = 0; END$$ CREATE DEFINER=`DB_NAME`@`localhost` PROCEDURE `deleteOldGangs`() BEGIN DELETE FROM `gangs` WHERE `active` = 0; END$$ DELIMITER ; -- -------------------------------------------------------- -- -- Table structure for table `players` -- CREATE TABLE IF NOT EXISTS `players` ( `uid` int(12) NOT NULL AUTO_INCREMENT, `name` varchar(32) NOT NULL, `playerid` varchar(50) NOT NULL, `cash` int(100) NOT NULL DEFAULT '0', `bankacc` int(100) NOT NULL DEFAULT '0', `coplevel` enum('0','1','2','3','4','5','6','7') NOT NULL DEFAULT '0', `cop_licenses` text, `civ_licenses` text, `med_licenses` text, `cop_gear` text NOT NULL, `med_gear` text NOT NULL, `mediclevel` enum('0','1','2','3','4','5') NOT NULL DEFAULT '0', `arrested` tinyint(1) NOT NULL DEFAULT '0', `aliases` text NOT NULL, `adminlevel` enum('0','1','2','3') NOT NULL DEFAULT '0', `donatorlvl` enum('0','1','2','3','4','5') NOT NULL DEFAULT '0', `civ_gear` text NOT NULL, `blacklist` tinyint(1) NOT NULL DEFAULT '0', PRIMARY KEY (`uid`), UNIQUE KEY `playerid` (`playerid`), KEY `name` (`name`), KEY `blacklist` (`blacklist`) ) ENGINE=InnoDB DEFAULT CHARSET=latin1 AUTO_INCREMENT=12 ; -- -------------------------------------------------------- -- -- Table structure for table `vehicles` -- CREATE TABLE IF NOT EXISTS `vehicles` ( `id` int(12) NOT NULL AUTO_INCREMENT, `side` varchar(15) NOT NULL, `classname` varchar(32) NOT NULL, `type` varchar(12) NOT NULL, `pid` varchar(32) NOT NULL, `alive` tinyint(1) NOT NULL DEFAULT '1', `active` tinyint(1) NOT NULL DEFAULT '0', `plate` int(20) NOT NULL, `color` int(20) NOT NULL, `inventory` varchar(500) NOT NULL, PRIMARY KEY (`id`), KEY `side` (`side`), KEY `pid` (`pid`), KEY `type` (`type`) ) ENGINE=InnoDB DEFAULT CHARSET=latin1 AUTO_INCREMENT=2 ; -- -------------------------------------------------------- -- -- Table structure for table `houses` -- Needed for extDB latest update on git -- CREATE TABLE IF NOT EXISTS `houses` ( `id` int(11) NOT NULL AUTO_INCREMENT, `pid` varchar(32) NOT NULL, `pos` varchar(64) DEFAULT NULL, `inventory` text, `containers` text, `owned` tinyint(4) DEFAULT '0', PRIMARY KEY (`id`,`pid`) ) ENGINE=InnoDB DEFAULT CHARSET=latin1 AUTO_INCREMENT=4 ; -- -------------------------------------------------------- -- -- Table structure for table `gangs` -- Needed for extDB latest update on git -- CREATE TABLE IF NOT EXISTS `gangs` ( `id` int(11) NOT NULL AUTO_INCREMENT, `owner` varchar(32) DEFAULT NULL, `name` varchar(32) DEFAULT NULL, `members` text, `maxmembers` int(2) DEFAULT '8', `bank` int(100) DEFAULT '0', `active` tinyint(4) DEFAULT '1', PRIMARY KEY (`id`), UNIQUE KEY `name_UNIQUE` (`name`) ) ENGINE=InnoDB DEFAULT CHARSET=latin1; /*!40101 SET [email protected] _CHARACTER_SET_CLIENT */; /*!40101 SET [email protected] _CHARACTER_SET_RESULTS */; /*!40101 SET [email protected] _COLLATION_CONNECTION */;
Mit OK wird die Eingabe bestätigt.
FAQ
- Warning: 11:35:42 – The database: ni119016_1 is not loaded in through the Databases.txt file.
- Diese Meldung bedeutet, dass in der “life_server.pbo” nicht der korrekte Datenbankname eingetragen wurde.
6/1/2022
Hol dir jetzt deinen eigenen Gameserver.
Gameserver bestellen


d2df0868
© 2026 marbis GmbH. Alle Rechte vorbehalten. Alle Preise sind Endpreise inkl. gesetzlicher Umsatzsteuer.