Guides
Minecraft Nether and End – How To Reset
Throughout Minecraft adventures, players are taken to many different worlds. From seaside shores filled with aquatic creatures to explore to traveling into caverns covered in deep dark monsters to battle. With each world more unique than the next, it’s great to explore every one of them to uncover all the different items, blocks, and treasures inside. During Minecraft server game time, worlds can run out of resources and treasures to find and when that happens, it can lead players to become bored and no longer want to play. To best fix this, we recommend resetting the Minecraft Nether and The End.
Resetting your dimension worlds in Minecraft not only generates new versions of those worlds for players to explore, but will also place in newly generated items, blocks, and treasures to unveil. For players bored of the previous worlds, this adds a new breath of air where players can gather plenty of new resources and build new creations. When performing a reset of a dimension it only takes a few minutes but will provide everlasting enjoyment to your players.
⚠️ We strongly recommend backing up your worlds before resetting dimensions. The best way to do this is by creating a manual backup or using the built-in backup tools on your system.
Singleplayer Worlds (1.21 & Below)
- Open your Minecraft launcher, then click
Installationsat the top.

- Find your profile, then click the folder icon on the right.

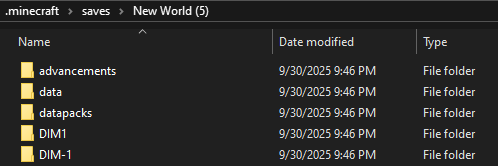
- Enter the
savesdirectory and open up your world folder. - Right-click and delete
DIM-1(Nether) andDIM1(End).
- These dimensions are now erased and reset in your singleplayer world.
Singleplayer Worlds (26.1 & Above)
- Open your Minecraft launcher, then click
Installationsat the top.
- Find your profile, then click the folder icon on the right.

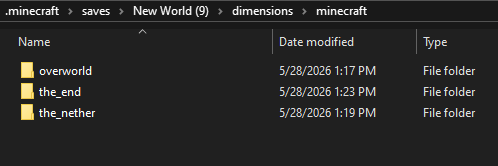
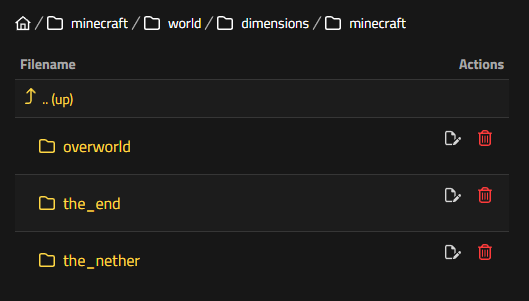
- Enter
saves> your world folder >dimensions>minecraft. - Right-click and delete the
the_netherandthe_endfolders.
- These dimensions are now erased and reset in your singleplayer world.
Vanilla Minecraft Servers
- Head towards your Nitrado Web Interface and stop the server.
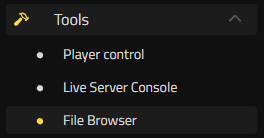
- Navigate to
Tools>File Browseron the left from your Dashboard.
- Click
minecraft, then find and enter your world folder. - Press the delete button for
DIM-1(Nether) orDIM1(End). - (For 26.1+) Enter the
dimensions/minecraftfolder and deletethe_end/the_nether.
- Start up the server and join to confirm the dimension(s) is reset.
If you have a custom world or world name, make sure to enter its correct folder name.
Bukkit/Spigot Minecraft Servers
- Head towards your Nitrado Web Interface and stop the server.
- Navigate to
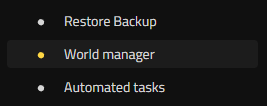
Tools>World Manageron the left from your Dashboard.
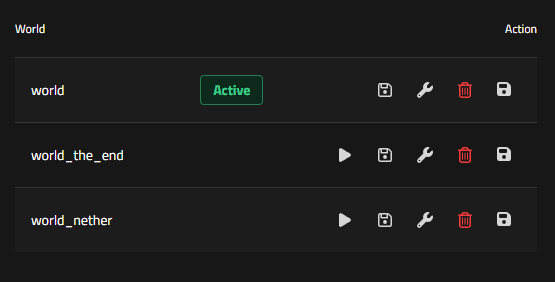
- Locate your
world_netherandworld_the_endfolder in the list. - Press the delete button for the dimension you want to reset.
- Start up the server and join to confirm it’s been reset.
If you have a custom world name, make sure to enter the correct world folder.
Bedrock Minecraft Servers
Unlike other server types that separate the Nether and The End into separate folders in your server files, Bedrock Edition combines all your worlds into a single folder. Due to this, the process of resetting your Nether and The End on a Bedrock server is more complicated. To ensure you can complete this process smoothly, you can find a detailed outline below that shows how to reset the Nether and The End on your Bedrock server!
Preparing Your Bedrock Server World
- Enter your Minecraft Bedrock server panel and stop your server.
- Then, log in to your FTP with an external FTP such as FileZilla by using this guide.
- Within the server FTP, enter the folders “minecraftbedrock” ➜ “worlds”.
- Find your main server world and download it to your computer.

- After uploading the world folder to your PC, find that folder and enter it.
- Then, using a program such as 7Zip or WinRAR, select all of the files inside that world folder and click “Add to Archive”.

- Inside the “Add to Archive” window, you’ll need to set the “Archive format” to “zip” and then at the top for the file name, replace “.zip” with “.mcworld”. This will change the world folder to a Minecraft Bedrock-compatible world that you can import into your game.

- Next, open Minecraft: Bedrock Edition and go to the main menu.
- Then, press the “Play” option and click the “Import” icon.

- Afterward, locate the .mcworld file you created, select it, and press “Import”.
- With everything correctly set up, the import will be a success and you will see that world appear in your list of “Worlds”.

- If the import fails, double-check that steps #6 and #7 were followed correctly. You’ll need to ensure that the files inside the world folder are archived into the .mcworld file and not the entire world folder itself. The correct archive format will ensure the world is imported successfully.
- Lastly, join the world once and then exit it. You’re now ready to follow the next steps to reset the Nether and The End of that world.
How to Reset the Minecraft Nether on your Bedrock World
- Once the world has been imported to Minecraft Bedrock, you’ll need the program Amulet which will allow you to edit the world’s dimension files directly.
- After Amulet is downloaded, unpack that .zip into an empty folder on your computer, access the program’s folder, and double-click on “amulet_app.application” to open it.

- Next, in the Amulet program, you will see the option “Open World”.
- Select this option, use the “Bedrock” dropdown, and find the world you prepared in the previous steps. In our example, that world is named “Bedrock level”.

- Inside the editor, on the left side, you’ll need to click the “3D Editor” option.
- Once that view has loaded, you can use the dropdown at the top to select the Nether or The End world that you’d like to reset.

- After selecting that world, at the bottom of the view, press “Chunk”. A small menu will appear on the left side to “Delete Chunks” and “Delete Unselected Chunks”.
- Without selecting any chunks in that world, press the “Delete Unselected Chunks” option. You can then press either yes to continue with a backup or no to continue without a backup. We recommend a backup just in case you need to restore those chunks.

- The deletion will now process and once that is done, you can repeat these steps if you need to reset your other Bedrock dimensions.
- Lastly, at the top left of Amulet press “File” and then “Save” to save those changes. It’s now time to export that world and add it back to your server!
Exporting the Bedrock World to Reset Minecraft Nether
- Once again, open Minecraft: Bedrock Edition and press “Play” to view your worlds.
- Then, find the world that you edited and click the pencil icon next to it.

- In the game settings for that world, scroll down until you see “Export World” and click that option.

- Afterward, export that world to a safe location on your computer.
- Next, find that world .mcworld file, select it, and using a program such as 7Zip or WinRAR, unzip that file to get all of your world’s files.
- Finally, move all of those files into a folder named after your original world’s name. For example, we are placing the files into a folder named “Bedrock level”.

Now that the world is formatted correctly, you’re ready to add that to your Bedrock server!
Uploading the Bedrock World to Your Server
- Firstly, log in to your server’s FTP externally using this guide.
- After logging in, your server files go to “minecraftbedrock” ➜ “worlds”. If the world you reset the Nether/The End for is still on your server, delete that folder.

- Next, upload the exported Bedrock world folder from the previous steps onto your server.

- Lastly, after the upload is complete you can start your Minecraft server to load that world. The Nether and The End will now be reset for that world!
If you decide to change the world’s name or plan to upload a custom Bedrock world to your server, you’ll need to set your server to load that world. You can follow these steps to change the default world of your Minecraft Bedrock server:
- To do that, on the left side of your server panel under “Settings”, click “General”.
- Within your server settings, find the “World name” option and set that to the name of the world you uploaded.
- Finally, press “Save changes” and start your server to load that world!
How to Reset Dimensions in Minecraft Modpacks
In Minecraft, the Nether and The End are dimensions of your main world. When it comes to modded Minecraft servers, modpacks can often add multiple dimensions beyond the regular game. A well-known example of this is the Twilight Forest mod’s dimension. Whether you’ve cleared the boss, have gotten all the loot in that dimension, or are simply looking to start anew, we’ll show you how to reset your modded Minecraft dimensions!
Local Minecraft Game Client
- Load Minecraft, press “Play”, and wait for the main menu to load.
- Then, click on “Options”, “Resource Packs”, and “Open Pack Folder” to access your Minecraft game files.
- Next, at the top select “.minecraft” to go to the main directory of your files.

- In your primary files, find and click on the “saves” folder to find your local Minecraft worlds. This includes your modded worlds. Find the modded world and click on it to access its files.

- After accessing that folder, you’ll see the Nether and The End dimension folders. Additionally, there will be a “dimensions” folder where your modded world’s extra dimensions are stored.

- In the example of the Pixelmon modpack, you’ll see a “Pixelmon” folder with two dimensions “drowned world” and “ultra space” inside.
- To then reset those dimensions, select their folders and delete them. Alternatively, you can simply rename them and the world will no longer recognize them.
- Lastly, start your modded Minecraft and join your world to generate new dimensions for your world!
Modded Minecraft Server
- Head to your Minecraft server webinterface and stop your server.
- Once your server is offline, to the left under “Tools”, click “File Browser”.
- Then, in your server’s files, you’ll a folder that will be named either “minecraftftb” or “minecraftotherpacks”. Select to enter that folder.
- Next, search for your Minecraft server world. Once you find it, click to enter its folder.
- Inside that folder, you can find your Nether and The End dimensions but you’ll also see another folder named “dimensions”. This is where modded dimensions exist.

- While in the dimensions folder, each dimension will be labeled either with a name or an ID. If the dimension is named after an ID, we recommend researching that ID on CurseForge/Google to determine which dimension that ID is linked to. In Pixelmon, for example, the dimensions folder will have a “pixelmon” folder and inside that, there will be two dimensions.

- To delete that dimension or multiple dimensions, press the “Delete” option next to each of them.
- Afterward, start your modded Minecraft server to regenerate them!
Looking for a Fresh Start on your Minecraft Server?
Rather than just resetting the Minecraft Nether and The End, you can also reset all of the files on your server to start with a fresh server installation. With new files and a new world, you can re-set up your Minecraft server settings, customize it, and bring newly created experiences and adventures for you and your friends to enjoy!
How to Reset a Minecraft Server
- Jump over to your Minecraft server webinterface.
- Looking to the left near the bottom, press the “REINSTALL” option.
- Then, your server will confirm if you would like to continue since your server will wipe all progress, configuration files, settings, and worlds. If that’s okay, press “REINSTALL” once more to continue.
- After a few moments, your server will restart with a fresh install.
You can now begin customization, creating your dream Minecraft server whether that’s Skyblock ☁️, Factions 🗡, Bedwars 🛏️, SMP 🛠️, PvP ⚔️, or anything else you can imagine! 🎉
Experience New Adventures in Your New Minecraft Nether and The End
After exploring Minecraft servers to understand how to reset the Minecraft Nether and The End, brand new journeys await. Will you fight the new Ender Dragon with your crew or maybe build the ultimate modded survival Minecraft server? No matter where your adventure goes, you’ll be able to try anything alongside your friends on a Minecraft game server!
Singleplayer Worlds (1.21 & Below)
Singleplayer Worlds (26.1 & Above)
Vanilla Minecraft Servers
Bukkit/Spigot Minecraft Servers
- Bedrock Minecraft Servers
How to Reset Dimensions in Minecraft Modpacks
- Local Minecraft Game Client
- Modded Minecraft Server
Looking for a Fresh Start on your Minecraft Server?
- How to Reset a Minecraft Server
Experience New Adventures in Your New Minecraft Nether and The End
