Guides
DayZ Chernarus Map Guide: Every Zone by Gear Tier
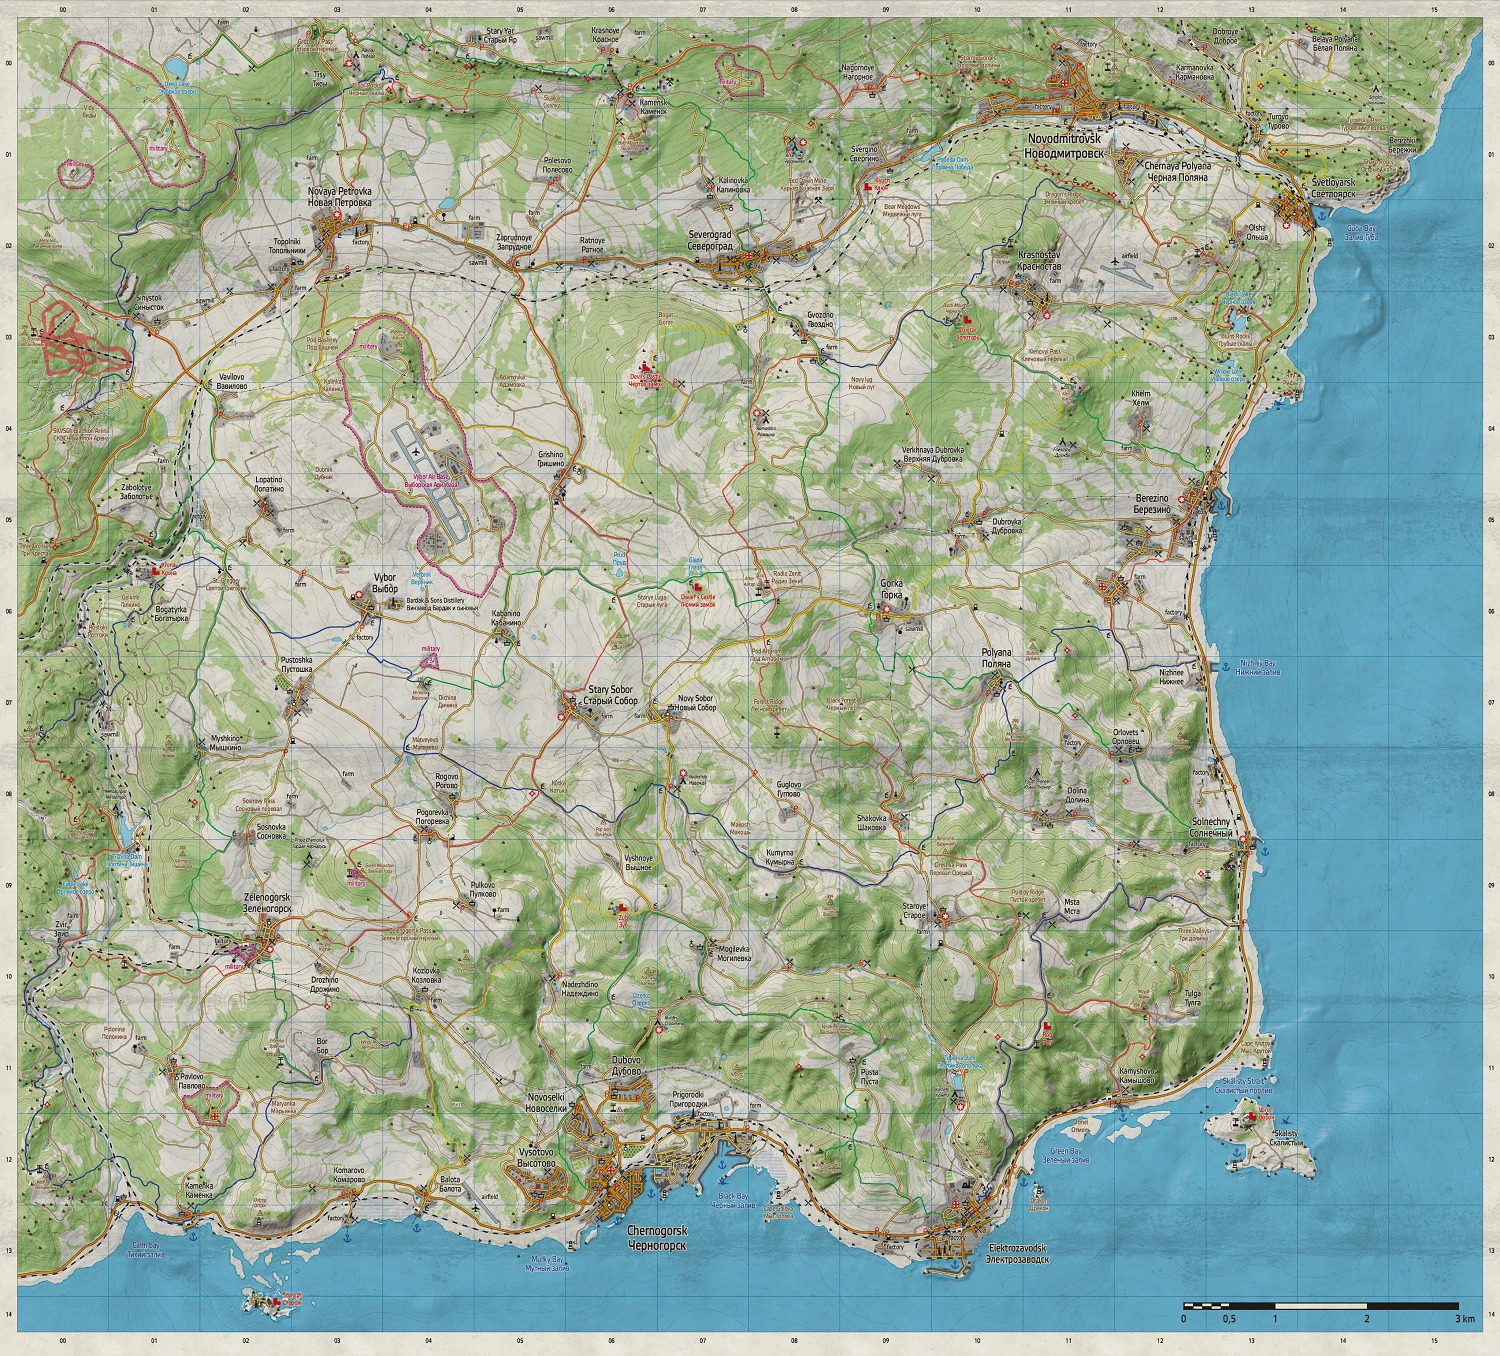
Spawning on a fresh Chernarus server in DayZ with nothing but a t-shirt and a flashlight is disorienting even for players who have logged hundreds of hours. The map is large, the coastline looks the same in three directions, and every zombie-filled town feels like it could be a trap. And if you’ve spent time switching between DayZ maps, it can take a moment to get your bearings in Chernarus again. You do not need to memorize all 225 km² of the DayZ Chernarus map to survive it, though. You need to know the next zone that matches your current gear tier, then the one after that. In this Nitrado guide, we’ll show you how Chernarus breaks down by survival stage, from your first can of beans on the coast to the military bases in the far north.
Fresh Spawns on the Chernarus Map: The Coastal Towns
Every run on the DayZ Chernarus map starts the same way: bare hands, a beating heart, and a coastline full of strangers who might help you or might not. Your only job right now is to get clothed, get fed, and get a weapon. Any coastal town gets you moving.
As of DayZ 1.29 Update, player spawn points were reworked to be far more random than before. Repeated deaths used to funnel players back to nearly the same stretch of beach; that predictability is largely gone now.
Where Most Survivors Wake Up: Chernogorsk, Elektrozavodsk, and Berezino
These three towns anchor the southern and eastern coast and see the heaviest fresh-spawn traffic on any Chernarus Dayz server.
- Chernogorsk: The largest coastal city. Dense apartment blocks and a hospital give it the most reliable food and clothing loot on the coast, along with the most player traffic.
- Elektrozavodsk: A sprawling industrial town north of Chernogorsk, known for factory buildings and a police station that occasionally turns up a sidearm.
- Berezino: A secondary hub on the northeastern coast, useful if Chernogorsk feels too crowded.
Quieter Alternatives to the Coast: Solnechny and Svetloyarsk
If the big three feel like a firefight waiting to happen, these two smaller coastal towns trade loot volume for lower risk.
- Solnechny: Lighter foot traffic than the big three coastal cities, with a smaller loot pool to match.
- Svetloyarsk: A similarly quiet start, useful when the goal is simply surviving long enough to move inland with confidence.
Moving Inland: Crossroads Towns and Early Military Loot
Once you’re clothed, fed, and carrying at least a basic melee weapon, the coast has done its job. The next stage in Chernarus is the crossroads belt between the coastline and the central highlands.
Stary Sobor, Novaya Petrovka, and the Central Crossroads
Both towns sit near the geographic middle of the map and funnel players moving off the coast in any direction, so move with a plan rather than lingering to loot every building.
- Stary Sobor: A mid-sized town with a mix of residential and industrial loot, plus a small nearby cluster of medical buildings.
- Novaya Petrovka: Slightly north of Stary Sobor, a useful waypoint toward the northern military zones.
Your First Taste of Military Gear: Balota and Krasnostav Airfields
Both airfields are where you should expect your first shot at military-grade assault rifles and body armor rather than the improvised gear you scavenged on the coast.
- Balota Airfield: Close to the southern coast near Chernogorsk, the most accessible military loot on the map for a player only a few lives deep.
- Krasnostav Airfield: Further inland, a similar tier of gear with fewer nearby survivors competing for it.
Neither airfield rivals the bases further north, but each is a legitimate stepping stone, and dying here costs a lot less than dying at Tisy with a full loadout.
The Central Highlands: Mid-Tier Bases and Trade Hubs
With an assault rifle on your back and a full inventory, the central highlands reward patience over luck. This stretch of the Chernarus Dayz map holds the mid-tier military bases.
Zelenogorsk and Severograd
- Zelenogorsk: A residential town with an attached military base, mixing civilian supplies with mid-tier weapons in one loot run.
- Severograd: A smaller settlement nearby, useful for restocking food and medical supplies without doubling back to the coast.
Neither town demands the vigilance the bases do, which makes both good spots to regroup with teammates and decide who pushes toward Pavlovo or Kamensk next.
Pavlovo and Kamensk Military Bases
- Pavlovo: A proper military base, not just an outpost, with tighter building clusters and more zombies than the coastal airfields.
- Kamensk: A comparable loot tier to Pavlovo, a step above Balota or Krasnostav.
Treat both as the point where situational awareness matters more than raw luck. Check the tree line before committing to a building, and don’t assume a quiet base means an empty one.
Pushing North: High-Tier Loot and the Endgame Military Zones
The far north of Chernarus is where the map stops being forgiving. This is endgame territory, and it should only be on your route once you already have decent weapons and enough supplies to survive a firefight.
Vybor Air Base and Green Mountain Military Base
- Vybor Air Base: Widely known in the community as the Northwest Airfield or NWAF, the largest military base and airfield on the map, tucked into the northwest corner near the town of Vybor. Its size means multiple loot spawns running at once, and the most heavily armed players on the server.
- Green Mountain Military Base: Further east, a comparable loot tier with typically less player traffic, a reasonable alternative when NWAF looks too hot.
Tisy Military Base: Chernarus’s Toughest Loot Run
Tisy sits in the far north, close to the Russian border, and it has a reputation for being one of the toughest and most rewarding loot runs on the map. The trip takes you through long stretches of open terrain with almost no civilian cover. Anyone else you run into up there made the same gamble you did: the loot is worth the risk. If you know how to reach and survive Tisy, you’ve probably got a solid grasp of the northern part of Chernarus.
Beyond the Mainland: Islands and Remote Endgame Risk
Both islands below sit off Chernarus’s coast, and both are about as far from the beaten path as this map gets. Traffic is low simply because reaching them takes real effort, and that isolation is the entire appeal.
- Utes: High-tier loot on par with the northern bases and few players around to contest it.
- Skalisty Island: Equally remote, reachable only by boat or a long swim, with the same reward for the isolation.
Treat the islands as a deliberate endgame detour: a place to go once the mainland’s military zones feel solved and you want risk that comes from logistics rather than gunfights.
Using a DayZ Interactive Map and Loot Tier Map for Chernarus
A written guide can tell you which zones match your gear tier, but it can’t show you exact building layouts or live server events. That’s the job of community-run tools. A DayZ interactive map tool for Chernarus typically lets you search specific locations, filter loot by category, and toggle layers on and off so the map only shows what matters for your current run. You can even activate a loot tier map filter: it overlays color-coded zones showing where low, mid, and high-tier gear tends to spawn, which is useful for confirming that a base you’re considering actually matches your current stage before you commit the travel time.
Navigate through Chernarus with Ease
Public servers hand you someone else’s loot rates, someone else’s spawn rules, and someone else’s neighbors camping the airfield you wanted. You now know how Chernarus breaks down by survival stage, from the coastal towns where every run starts to the northern bases where only the geared survive. Renting your own Nitrado DayZ server puts that whole progression on your terms: adjust loot spawns, tune zombie density, and build a base near whichever zone fits how your group actually plays, from a quiet coastal start to a fortified foothold near the northern military bases.
Fresh Spawns on the Chernarus Map: The Coastal Towns
- Where Most Survivors Wake Up: Chernogorsk, Elektrozavodsk, and Berezino
- Quieter Alternatives to the Coast: Solnechny and Svetloyarsk
Moving Inland: Crossroads Towns and Early Military Loot
- Stary Sobor, Novaya Petrovka, and the Central Crossroads
- Your First Taste of Military Gear: Balota and Krasnostav Airfields
The Central Highlands: Mid-Tier Bases and Trade Hubs
- Zelenogorsk and Severograd
- Pavlovo and Kamensk Military Bases
Pushing North: High-Tier Loot and the Endgame Military Zones
- Vybor Air Base and Green Mountain Military Base
- Tisy Military Base: Chernarus’s Toughest Loot Run
Beyond the Mainland: Islands and Remote Endgame Risk
Using a DayZ Interactive Map and Loot Tier Map for Chernarus
Navigate through Chernarus with Ease