指南
Nitrado Server Panel: How to Navigate & Use It
Navigating the Nitrado server panel and web interface can be confusing for new server owners, especially when you’re not sure what each section does or where to find a specific setting. The interface includes a range of options for managing your server, from basic configuration and service settings to commands, files, and other tools. In this Nitrado guide, we’ll break down the different sections, explain what the options do, and show you where to find the settings you need.
Finding Your Server
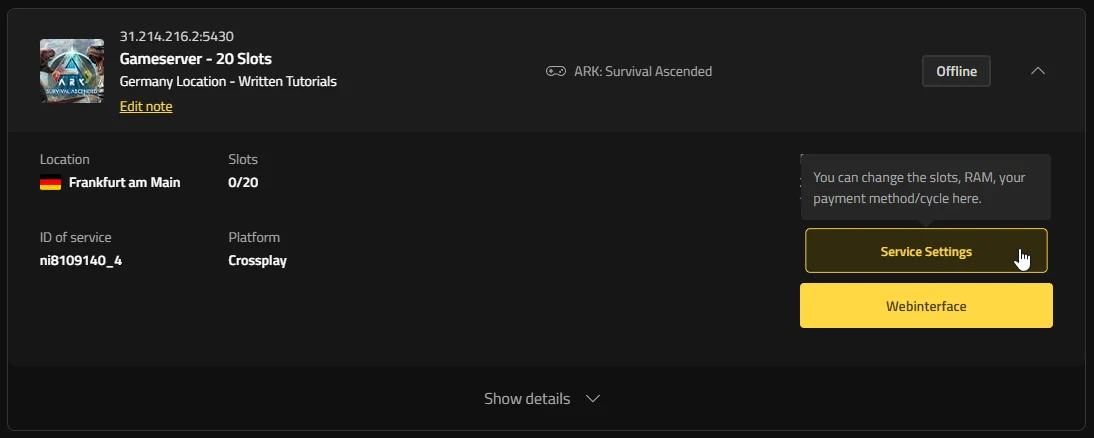
Log into your Nitrado account and open the service overview (My Services) to see all of your game servers. Each server is collapsed by default, which keeps the page easy to scan, especially if you manage multiple servers. Expanding a server reveals Service Settings, Webinterface, and Guest Access. Service Settings covers billing and server capacity, while Webinterface takes you to the main control panel where you manage the server. Guest Access lets you give others access to the server without sharing your Nitrado account credentials.
Managing Guest Access Rights
Running a server solo works fine until real life gets in the way: a vacation, a busy week at work, or just wanting someone else to help keep an eye on things. If a co-admin or a friend needs their own login for a specific server, guest access covers it without sharing your account, and without them ever seeing your billing details. It isn’t available for Xbox servers, but works the same way across the rest of the guide:
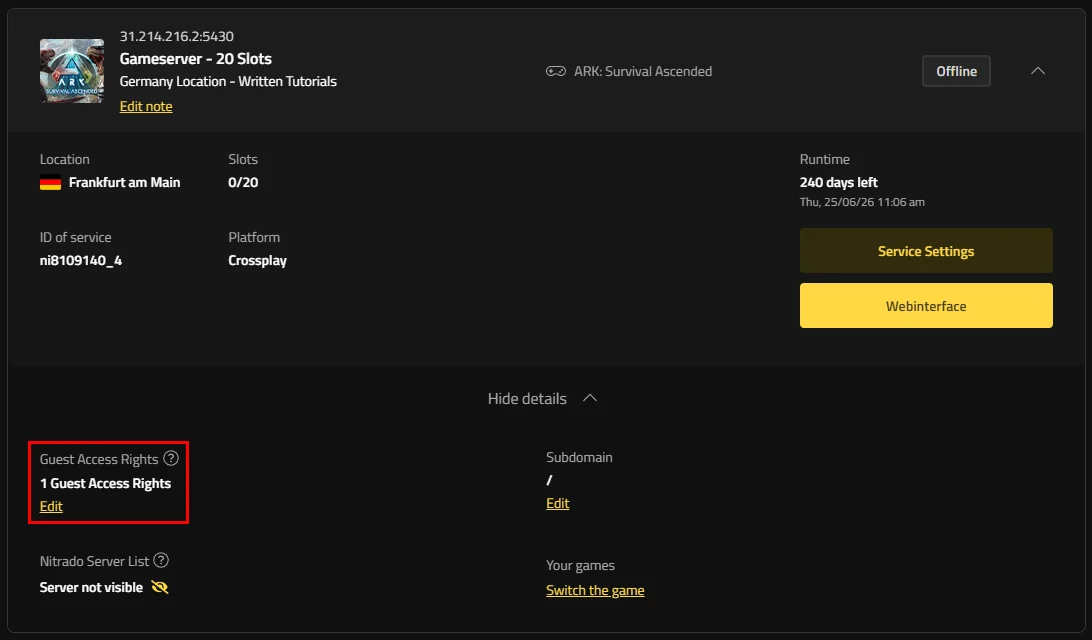
- Expand the service you want to share, then edit the Guest Access Rights.
- Enter the user’s name and click Add User.
- Select the permissions to grant from the sheet that appears under their name.
- Click Save to apply the access rights.
You can hand over as much or as little control as you’re comfortable with, anywhere from full server management down to a single permission like restarting the server when you’re not around.
Service Settings: Subscriptions, Runtime, and Upgrades
This is the hub for anything tied to your plan and your billing: how long the server runs, whether it renews automatically, and how much capacity it has. A growing community, a modpack that suddenly needs more RAM, or a season that’s about to end all get handled from here, instead of being buried somewhere in general account settings. Three options live here, and each has its own dedicated Nitrado guide for the full walkthrough.
Manage Subscription (Auto-Renewal)
Here you control whether your server automatically renews itself when the current term ends, so you’re not stuck remembering an exact expiration date every billing cycle.
- In Service Settings, click Manage Subscription.
- Toggle Auto-Renewal on or off. If it’s on, choose a payment type (Nitrado credits, card, or PayPal), set the Auto Renewal Runtime, and redeem a promo code if you have one.
- Click Continue, check the summary window, then click Save Changes.
Turning it on means one less thing to track if the server is a long-term project. Turning it off makes more sense for a server you’re planning to wind down, so it doesn’t quietly renew after you’ve already moved on.
Extend Runtime
Add days to your current server term, which comes in handy when a playthrough runs long, a LAN weekend gets extended at the last minute, or you just want a few more weeks before deciding whether to commit to a longer plan.
- In Service Settings, select Extend Runtime.
- Choose how many days to add, with an optional promo code.
- Click Continue, check the summary window, then press Extend Now.
It’s the quickest way to buy more time without changing anything else about how the server is set up.
Upgrades & Downgrades
Slots, RAM, and Runtime aren’t fixed for the life of the server; they can move with your community. A group that’s outgrown its slot limit, or a build that’s started chugging under a heavier modpack, both point to the same fix.
⚠️ Important: Stop your server before making any changes here. Upgrades and downgrades depend on the server being offline.
- In Service Settings, select Upgrades & Downgrades.
- Adjust Player Slots, RAM, and Runtime as needed, then click Continue.
- Check the summary window and click Save Changes.
Adding capacity uses up some of your remaining runtime. Removing capacity extends the runtime through the leftover credit, so scaling down after a season ends isn’t wasted money as it converts straight back into time.
Getting to Know the Nitrado Web Interface
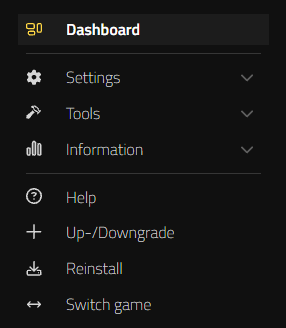
Once you’re inside, the web interface brings together everything you need to manage the server: live status and credentials, server configuration, management tools, activity logs, and options for reinstalling or switching games. Service settings deal with the administrative side of things, while the web interface is where you handle the server itself and the work that keeps it running. The different sections are organized around specific parts of server management, from checking its current state and reviewing activity to changing the setup or preparing it for a different game. Together, they give you a central place to monitor the server, make changes, and deal with the routine tasks that come with keeping it online and playable.
Dashboard
This is the first place to check for a quick read on how your server is actually doing, plus the connection details other software need to talk to it directly. Nothing here needs to be changed as it’s a reference more than a control section.
- Server Status: IP address, port, memory usage, and current player count, the kind of at-a-glance health check you’d want before digging into anything else.
- RCON: The credentials remote admin tools and some plugins use to send commands without you being logged into the console yourself.
- FTP Credentials: Clients like FileZilla need those to manage your server’s files outside the built-in file browser.
- MySQL Credentials: Some mods or plugins use this if they need a real database to store its own data instead of a flat file.
You won’t need all four every day, but knowing where they live saves time when a tool or a mod’s setup asks for one.
Settings
In this section is where you shape how the installed game actually plays and runs. It always includes two core options, with more sometimes appearing depending on which game is currently installed on the server.
- General: The main configurable settings for whichever game is installed, wrapping common settings in a friendly toggle or field instead of asking you to know the underlying config syntax. This is where most of your server setting changes happen.
- Config Files: More advanced, technical settings that don’t appear in General. Useful once you’re comfortable editing values directly or want more precise control than a toggle allows.
Depending on the game, extra options like a Mods section or World settings can also show up here, so it’s worth a quick look around after checking General and Config Files.
Tools
Tools hold the operational features, the ones you’ll actually reach for once the server is up and people are playing on it.
- Live Server Console: Send commands directly to the server and watch console output in real time. It’s useful for testing a command before scheduling it or seeing exactly what’s happening when something goes wrong.
- File Browser: Gives you direct FTP-style access to create, edit, and delete files. Handy for installing a mod that skips the one-click installer or tweaking single files.
- Restore Backup: View and roll back to previous backups, turning a corrupted save or a bad mod update from a disaster into a five-minute fix.
- Automated Tasks: Schedule server starts, restarts, and stops. A scheduled restart every so often clears out memory and keeps performance steady over long uptimes, the kind of maintenance that’s easy to forget about until the server starts lagging for no obvious reason.
- Player Control: Add players to a whitelist or banlist among other things, though it’s game-dependent and not every game has this option available.
Between these, most of the hands-on server management happens right in this one section.
Information
If you want to keep a record of what’s happening on your server, then this is where you’ll need to look.
- Event Log: Shows you direct and indirect actions taken on the server. It’s helpful for spotting who changed a setting or restarted it after you’ve handed out guest access to a few people. If Nitrado support makes a change while helping you troubleshoot something, that shows up here too.
- Log Files: A more detailed record of server activity for deeper troubleshooting, the kind of detail you’d reach for when a crash or an error needs more context than the Event Log gives you.
Between the two, you’ve got a paper trail for almost anything that happens on the server.
Help

A small section that points you to the right place no matter what kind of problem you’re actually having, whether it’s a setting you can’t find, an account issue, or just wanting to talk to other players.
- Guides: Redirects you to our guides section, where you’ll find articles that walk you through anything you might need help with regarding your game server.
- Discord: Join our Nitrado Community Discord server, where you can connect with other players, search for servers to play on or ask to join someone else’s, join community events, or ask for help.
- FAQ: Redirects to our Support page, where scrolling down gets you FAQs organized by topic, like getting started, security and safety, billing, and more.
- Support: This also sends you to our Support page, where clicking Chat With Us opens a support chat with FIN, Nitrado’s AI chatbot, or lets you ask to speak with a support agent directly.
FAQ and Support both land on the same page, so if one doesn’t have your answer, the other is right there too.
Up-/Downgrade
The only section that doesn’t run its own flow inside the web interface. Instead, selecting it redirects you back to Upgrades & Downgrades under Service Settings, the same option covered earlier in this guide, so any slot, RAM, or runtime change happens there.
It’s really just a shortcut for when you’re already deep in the web interface and don’t want to navigate back.
Reinstall
Clicking on Reinstall puts a fresh copy of the currently installed game onto your server, replacing the existing installation from the start. Current progress and configuration are permanently lost when you use it, so treat it as a last resort for a server that’s already unusable, not a routine reset.
Switch Game
You can change the game installed on your server, switching from one title to another on the same service. It’s the option that saves you from paying for a second server just to try something new with the same group of friends, or to run a seasonal favorite for a few weeks before switching back. Review our guide on the game switching feature and possible dangers before using it.
Take Full Control of Your Nitrado Server
By now, you should have a clearer idea of where everything is located and what each part of the Nitrado interface is used for. Billing, server access, and service settings are handled separately from the tools you use to manage the server itself. Once you’re familiar with the layout, common tasks like changing the player limit, scheduling a restart, checking the console, or accessing server files become much easier to manage. You won’t have to search through every menu to find a particular setting, and you’ll know which section to check when you need to make a change or troubleshoot an issue.
Finding Your Server
- Managing Guest Access Rights
Service Settings: Subscriptions, Runtime, and Upgrades
- Manage Subscription (Auto-Renewal)
- Extend Runtime
- Upgrades & Downgrades
Getting to Know the Nitrado Web Interface
- Dashboard
- Settings
- Tools
- Information
- Help
- Up-/Downgrade
- Reinstall
- Switch Game
Take Full Control of Your Nitrado Server