指南
How to Set Up a Valheim Dedicated Server
Creating your own dedicated server for Valheim is a great way to host a public community or private group. You have full control over the gameplay settings and with increased performance. However, the process to manually host your own server can be complicated. In this Nitrado guide, we will show you how to create your own Valheim dedicated server and explore port forwarding, crossplay settings, and customization.
Our expert went through the process of self-hosting a server and had this to say:
“Getting the server online was easy, but trying to get others to connect was the tricky part. If you have crossplay enabled, my friends can use the invite code to join. The only problem is that no direct IP/Port connection was possible, unless I port forwarded. Without crossplay, this process is required for others while I can use my local IP to join. The steps to do a port forwarding was complicated, as it involved tweaking UDP ports 2456-2458 on my router and firewall.
Fortunately, once I managed to do that my friends were finally able to join using the IP/Port. Now I can begin customizing the server, such as installing BepInEx mods or editing general settings. Finding the right locations for setting up the server was relatively straightforward, but can be confusing for the first time. The downside is that my computer has to be running 24/7 to keep the server online so my friends can play when I’m away. Hosting a Nitrado server is by far much easier, especially since they handle all the backend routing and configurations.” – Nathan, Valheim Server Expert
Rent Your Own Valheim Server!
With that said, begin following the sections below to host your own Valheim Dedicated Server.
Getting Started
In order for you to host, install the Valheim Dedicated Server tool from your Steam Library. Afterwards, you can immediately start editing its startup parameters to adjust various settings.
- Launch Steam and search for “Valheim Dedicated Server” in your Library.
- Download the tool on your computer, then stay on Steam.
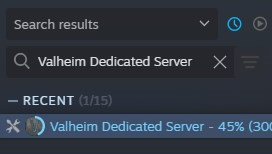
- Right-click Valheim Dedicated Server, select
Manage, thenBrowse Local Files.
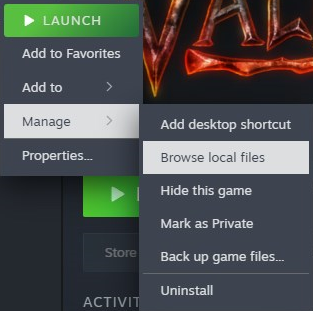
- Right-click
start_headless_server.batand selectEdit(with Notepad or another editor). - Configure your server command line arguments:
-name "Your Server Name"-port 2456-world "Your World Name"-password "YourPassword"(Must be at least 5 characters)-public 1(Add this for public server browser listing, set it to 0 for unlisted)-crossplay(Keep this flag to allow Xbox and PC cross-platform support)

- Save and close the file, then launch Valheim Dedicated Server from Steam.
- Wait until you see “Game Server Connected” or “IP [Public IP:Port] is active”.

The message depends on if crossplay is enabled or disabled.
Connection Testing
Confirm if you can successfully join the dedicated server. This process is different if you have crossplay enabled or not. Review the following according to your setup:
- Crossplay Enabled: Valheim routes connections through the Microsoft PlayFab relay infrastructure. 127.0.0.1:2456 localhost will NOT work, but you can use the Public IP:Port shown in your Command Prompt console (E.g. 57.142.224.67:2456). Other players cannot use that, so they will need to use the Invite Code – shown in the same console area.
- Crossplay Disabled: The server host connects on the same PC using 127.0.0.1:2456. Outside players connect using Public IP:Port (port forwarding is required).
Port Forwarding
If you’re hosting a non-crossplay server, then port forwarding is absolutely necessary. For crossplay servers, we strongly recommend port forwarding since it’s healthier for the server in the long-run. Follow these steps to port forward your dedicated Valheim server:
- Open Command Prompt on your server host PC, type
ipconfig, and copy your IPv4 Address and Default Gateway IP Address. - Open a web browser, enter your Default Gateway IP Address into the address bar, and log into your router.
- Locate the
Port ForwardingorNAT Rulessection in your router’s admin panel. - Create a rule pointing ports
2456–2458(UDP) directly to your PC’s IPv4 Address. - Open your Windows Firewall settings and create an
Inbound Ruleallowing traffic on ports2456–2458(UDP). - Search “what is my IP” in a web browser to locate your Public IP address.
- Follow these instructions depending on your configuration:
- No Crossplay: Connect using
127.0.0.1:2456, other players usePublic IP:Port. - Crossplay: Connect using
Public IP:Port, other players use the Invite Code. - (Optional): For servers with a public listing, players can search the Server Name to join.
- No Crossplay: Connect using
Server Files / Settings
For those wanting to install mods or tweak general settings, you need to locate the server files. Follow these instructions to find them:
- Right-click Valheim Dedicated Server from your Steam Library.
- Hover over Manage, then select Browse Local Files.
- Navigate to the directory of your choice:
- Server Start Script / Config: …\Valheim Dedicated Server\start_headless_server.bat
- Save Files & World Data: %USERPROFILE%\AppData\LocalLow\IronGate\Valheim\worlds_local
- Admin & Ban Lists: %USERPROFILE%\AppData\LocalLow\IronGate\Valheim\adminlist.txt
- Mods & Plugins: …\Valheim Dedicated Server\BepInEx\plugins
Modifying the start_headless_server.bat file is where you edit primary server settings.
Nitrado Valheim Server Hosting
One major issue when self-hosting your own Valheim Dedicated Server is that your computer must always be running with the software launched. If you turn off your computer at any point, the server will shut down. Compare that with Nitrado, it remains online 24/7 without interruption – plus there are more benefits when hosting with us:
| Feature | Nitrado Dedicated Server | Self-Hosting on Your PC |
|---|---|---|
| Server Availability | 24/7 Uptime: Runs continuously so friends can play anytime without you. | Requires PC Running: Your computer and server software must stay online for players to join. |
| PC Performance | Zero PC Strain: Uses no RAM or CPU on your machine, keeping your gaming smooth. | Heavy FPS Drops: Eats up RAM and heavy CPU power on your own rig. |
| Setup & Control | One-Click Panel: Easy Web Interface for toggling crossplay, changing settings, and installing mods. | Complex Setup: Requires router port forwarding, batch file edits, and manual patching. |
| Network Security | DDoS Protection: Keeps your home IP address hidden and secure. | Exposes Home Network: Forces you to share your private home IP address with external players. |
| Save Protection | Automatic Backups: Instant one-click restoration if save data corrupts. | Corruption Risk: PC crashes or power loss can permanently wipe your world save file unless backed up manually. |
| Connection Quality | Enterprise Speeds: Fast hardware ensures low ping and lag-free play for everyone. | Home Network Limits: Restricted by home internet upload speeds, causing lag spikes for friends. |
| Power & Hardware Wear | Fixed Low Cost: Zero impact on home electricity bills or component lifespans. | Higher Electric Bills: Running a PC 24/7 spikes power bills and wears down hardware. |
Easier setup, faster customization, increased performance, better security, available today. Consider renting from us to host your Valheim server to play with friends or build a community!