Guides
How To Host a Minecraft Server
Everyone wants to play Minecraft with friends or family, but that involves creating a server. Whether you want to host a small group or build a large community, it’s entirely possible to do it on your own computer. However, the setup to manually do this can be challenging and complicated. In this Nitrado guide, we will show you how to host a Minecraft server, including port forwarding, configuration, and customization.
Our expert went through the process of self-hosting a server and had this to say:
“There are two options when self-hosting, a dedicated server or LAN server. Both of these are viable to play Minecraft with friends or family, but are two completely different setups. The process to host a dedicated server is more advanced, requiring you to download server software, configure files, and port forward. This is worthwhile if you want people from around the world to connect.
Meanwhile the LAN server only requires you to enable it in a singleplayer world, then sharing your IPv4 Address with friends and family in your house. Outside connections, such as across the street or in a different country, cannot join the server using this method. Additionally, you are more limited in customization when using a LAN server.
For those who want to save time and potential headaches, hosting a Minecraft server with Nitrado is your best bet. We handle all the backend work, meaning in just a few clicks you can begin playing with friends from anywhere in the world. Install mods, plugins, set up custom worlds, and so much more all from your web interface. No need to stress!” – Nathan, Minecraft Server Expert
With that said, begin following the sections below to host your own Minecraft dedicated server.
Getting Started
Before anything, download the latest version of the Minecraft server software from the official source. If you want a specific version, we recommend checking out MCVersions to download archived server jar files. After downloading it, follow these steps to set up your own Minecraft dedicated server:
- Create a folder named
Minecraft Serverand moveserver.jarinside it. - Create a new text file in that folder, rename it
start.bat, and paste the following code:java -Xms2048M -Xmx2048M -jar server.jar nogu PAUSE - Double-click
start.batto generate the initial server files. - Open the generated
eula.txtfile and changeeula=falsetoeula=true. - Open
server.propertiesin Notepad to edit general settings, e.g. gamemode, motd. - Double-click
start.batagain to launch the server.
Connection Testing
Confirm if the server is working properly by directly connecting to it. Use 127.0.0.1:25565 or localhost:25565 for the IP Address in the Multiplayer menu. If successful, you should be able to join the self-hosted Minecraft server. Keep in mind that other players cannot connect until you port forward.
Port Forwarding
Before players can join your server, you must port forward. This is necessary to allow incoming outside connections. Follow these steps for port forwarding your Minecraft server:
- Open Command Prompt on your server host PC, type
ipconfig, and copy your IPv4 Address and Default Gateway IP Address. - Open a web browser, enter your Default Gateway IP Address into the search bar, and log into your router.
- Locate the
Port ForwardingorNAT rulessection in your router’s admin panel. - Create a rule pointing port
25565(TCP/UDP) directly to your host PC’s IPv4 Address. - (Optional): If needed, point port 25575 (TCP) to your IPv4 Address for remote admin (RCON) access.
- Open your host PC’s Windows Firewall settings and create an
Inbound Ruleallowing traffic on port25565(TCP/UDP). - Search “what is my IP” in a web browser to get your Public IP.
- Have friends or others connect using the
PUBLIC_IP:25565address.
Plugins & Modding
Standard vanilla server files do not support custom features, so adding plugins requires switching your server core to software like Paper or Spigot. Once installed, simply drop your downloaded .jar files into the newly generated plugins folder and restart the server. Plugins run entirely on the server side, meaning your friends can join instantly without needing to download anything on their end.
If you want to add new blocks, items, or custom dimensions, you will need to run a modded server using Forge, Fabric, or NeoForge. Installing your chosen modloader creates a mods folder in your server directory where you can drop your mod files. Keep in mind that unlike plugins, every player joining the server must install the exact same modloader and mod files on their personal Minecraft launcher.
LAN Server Setup
If you only want to play with family or friends at your house, you can do that with a LAN server. This uses your local network to establish a multiplayer world, only accessible from those connected to your internet. The following steps will help you do that:
- Launch Minecraft Java Edition and load your singleplayer world.
- Press
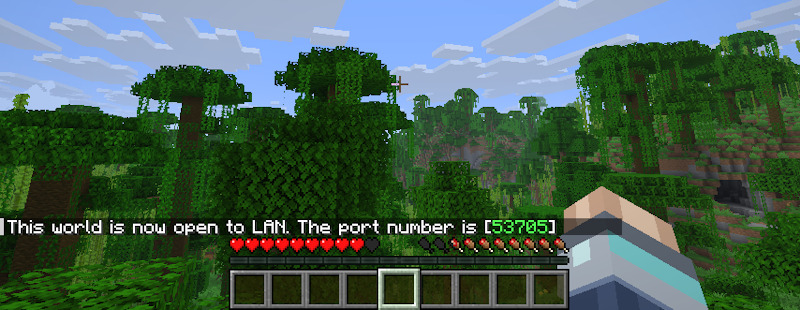
Esc, clickOpen to LAN, set your rules, and pressStart LAN World.- Newer versions: Press
Esc, clickWorld Options, and setLANtoON.
- Newer versions: Press
- Note the 5-digit
port numberdisplayed in the in-game chat. - Search for
cmdin your Windows search bar to open Command Prompt, typeipconfig, and copy your IPv4 Address. - Have others on your home network join using your combined IPv4 Address:Port (e.g.,
192.168.1.50:54321).
Nitrado Minecraft Server Hosting
One major issue when self-hosting your own Minecraft dedicated server is that your computer must always be running with the console active. If you turn off your computer at any point, the server will shut down for all players. Compare that with Nitrado, where your server remains online 24/7 without interruption – plus there are more benefits when hosting with us:
| Feature | Nitrado Dedicated Server | Self-Hosting on Your PC |
|---|---|---|
| Server Availability | 24/7 Uptime: Runs continuously so friends can play anytime without you. | Requires PC Running: Your computer and server software must stay online for players to join. |
| PC Performance | Zero PC Strain: Uses no RAM or CPU on your machine, keeping your gaming smooth. | Heavy FPS Drops: Eats up RAM and heavy CPU power on your own rig. |
| Setup & Control | One-Click Panel: Easy Web Interface for changing settings, switching versions, and installing plugins/mods. | Complex Setup: Requires router port forwarding, batch file edits, and manual patching. |
| Network Security | DDoS Protection: Keeps your home IP address hidden and secure. | Exposes Home Network: Forces you to share your private home IP address with external players. |
| Save Protection | Automatic Backups: Instant one-click restoration if save data corrupts. | Corruption Risk: PC crashes or power loss can permanently wipe your world save file unless backed up manually. |
| Connection Quality | Enterprise Speeds: Fast hardware ensures low ping and lag-free play for everyone. | Home Network Limits: Restricted by home internet upload speeds, causing lag spikes for friends. |
| Power & Hardware Wear | Fixed Low Cost: Zero impact on home electricity bills or component lifespans. | Higher Electric Bills: Running a PC 24/7 spikes power bills and wears down hardware. |
Easier setup, faster customization, increased performance, better security, available today. Consider renting from us to host your Minecraft server to play with friends or build a community!
Getting Started
Connection Testing
Port Forwarding
Plugins & Modding
LAN Server Setup
Nitrado Minecraft Server Hosting